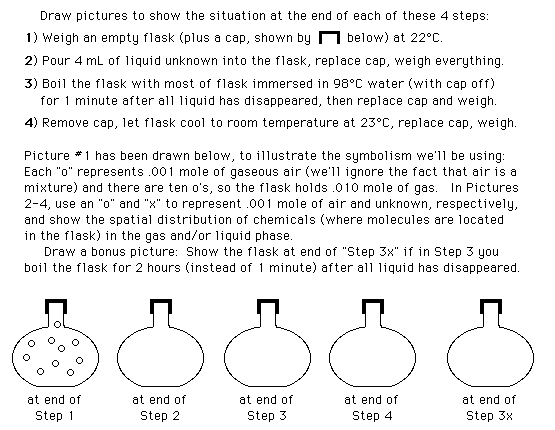
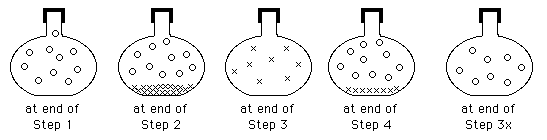
Scientific Thinking Skills in Science Labs
This page describes lab activities that can help students improve their thinking skills. Although most of the activities can be adapted (by “thinking with analogy”) for other subject areas, these examples are from labs for general chemistry.
It describes goal-directed Aesop's Activities that (analogous to Aesop's Fables) are designed to teach specific ideas and/or skills. The many examples come from my experience (as a Teaching Assistant and Faculty Assistant) during the early-1990s in the Chemistry Dept for the University of Wisconsin-Madison.
It begins with Three Overviews (they're a good place for you to begin), and then a Table of Contents for the five sections: Observation-Based Thinking, Skills for Data Analysis, Logic of Science, Process of Science, Inquiry Activities.
Three Overviews – Examples & Principles of
Thinking Skills in Labs for General Chemistry
1. For a goal-directed designing of curriculum & instruction we can
define goals for the ideas and skills we want students to learn, and
design instruction with learning activities and teaching strategies that will provide more opportunities for experiences with these ideas & skills,
and help students learn more from their experiences.
This page has concrete examples of learning activities that can promote thinking-and-learning by students.
2. Integrative Analysis of Instruction can help educators understand the structure of instruction, by using a table to show time-sequence relationships between thinking Activities (done in labs) and educational Goals, with the activities helping students achieve the goals.
This method of integrative analysis is explained in Teaching Scientific Method in Labs – with a table (of Activities & Goals) that uses lab-examples from this page.*
A teacher can find learning activities by thinking about each lab, searching for (and then effectively using) the educationally valuable ideas-and-skills that can be learned
in each lab.
2A) search for the valuable knowledge (ideas & skills) that can be learned in each lab,
2B) design teaching methods that will help students learn these ideas & skills.
* While making (in the other page) a table for Activities-and-Goals, I was remembering what happened (re: opportunities for thinking & learning) during the labs described in this page, so the table is illustrated with examples from this page. In the table, some of the thinking Activities (actually they're entire labs that I'm defining as Mega-Activities) and all of the educational Goals are taken from this page:
the labs are Competing Reactions & Reaction Videos & Takers and Givers & Alcohol Content of Wine and
the goals are Observation-Based Logic & Hypothetico-Deductive Logic & Calibration Logic &
If-Then Analysis of Errors & Analysis of Random Errors & asking "Does it matter?" &
Designing Experiments + Understanding Random vs Systematic Errors.
3. Below, each overview (for Part 1, Part 2,...) does two things: it briefly summarizes various thinking skills, and links to places in the page (all italicized links are inside-the-page) where useful skills — using observation-and-imagination, analyzing data, using scientific logic & scientific process — are described in more detail and are illustrated with lab activities:
Part 1 — Thinking Skills using Observation-and-Imagination
• Observation-Based Logic lets us interconvert different levels of thinking, when our macroscopic-level
observations are connected to science-based mental models of “what is happening” in submicroscopic-level events (with interacting atoms, molecules, and ions) and their symbolic
representations (as verbal words, visual pictures, mathematical symbols & equations, chemical symbols
& reaction-equations,...). A few basic ideas about this, in the introduction for Part 1, are illustrated with applications: Competing Reactions (which describes reflection requests intended to move students into a minds-on awareness that encourages learning) and the closely related Limiting Reactants where students observe an absence (so they can know when a reaction is finished, and why), plus Takers and Givers which is a reminder that reactions to take electrons (which neutral halogens can do) and give electrons (negative halides can do this) are different, so we get different answers when we ask about the relative reactivities of chlorine-vs-iodine and chloride-vs-iodide.
• Thinking Skills using Imagination are required to interconvert observations (including what we hear and read) with mental models, and this ability is important for understanding the concepts of chemistry and using them intuitively. When we are trying to help students improve their “conversion skills” we can ask, in a question that is the main theme of Part 1, "what are the relationships between observation and imagination when we... make mental connections between different levels of thinking (macro, micro, symbolic) and use our imaginations to build mental representations of chemistry concepts?" and we can provide opportunities for students to observe-and-imagine. Part 1 ends with a discussion of reflection requests that can help students learn more from their experiences in a lab where they "construct and observe 3-D physical models of chemical structures, in order to form their own mental
models."
Part 2 — Thinking Skills for Analyzing Data
• Basic Ideas-and-Skills: Students can learn a variety of related ideas & skills — the similarities and differences between precision & accuracy, and between random errors & systematic errors; why saying "5" or "5.00" is making different claims about the data and your confidence in it; differences between arithmetical processing of data with multiplication & division (using significant figures) and addition & subtraction (using decimal-columns); knowing that confidence in data can be described by significant figures, and also by absolute uncertainties & percent uncertainties (or percent error), and in other ways; know why an instruction to "precisely weigh approximately 2.0 g of NaCl" is not a contradiction; understand the difference between mass & weight, and how we measure mass — that are described in a list and are used for data-analysis handouts; and Automated Subtractions looks at the analogy when we tare a scale and zero a spectrometer.
• Data Analysis and Experimental Design: A creative-and-critical designing of experiments requires a careful consideration of many ideas, including some related to data collection-and-analysis, such as those in the list above and in another list: knowing the precision-and-accuracy characteristics for different types of glassware, and deciding what is most useful for each aspect of an experiment; appreciating the value of "large numbers" in data; asking "does it matter" during labwork.
• Correction of Errors by using If-Then Logic: To correct for an error (caused by experimental design or lab technique) we can use If-Then Analysis of Errors by comparing what should have happened with what actually happened, and asking "what would we observe if we did it correctly?"
Part 3 — The Logic of Science
In addition to what's below in Part 3, scientific logic is also used in other sections, including Observation-Based Logic in Part 1, and the "...If-Then Logic" above, and many more, because logic is used in all thinking activities, whether or not the word "logic" is used for their title or description.
• Hypothetico-Deductive Logic is comparing predictions with observations to make Reality Checks that are the essence of science; hypothetico-deductive thinking activities include finding crucial experiments and using The Logic of Le Chatelier.
• Calibration Logic assumes that "what happened before will happen again in a similar situation" so we can use old knowledge (about knowns) to generate new knowledge (about unknowns). Scientists & engineers can use quantitative calibration logic in a variety of ways (by making a calibration curve, playing with the variables in an equation,...) and also qualitative calibration logic, as in flame tests. The foundation of this logic is "things we know," which leads us to ask "how can we know something?" in questions about epistemology and assumptions.
• Conflicting Factors occur in many situations, and students should learn how to estimate the influence of various factors, and cope with the challenges of complex real-world situations, not just idealized simplifications. (basic ideas)
• Experimental Design is an important scientific skill, and is a prominent activity in the daily lives of scientists & engineers who design experiments by using ideas from this page, and many more, including a knowledge of errors (random & systematic) and strategies for optimizing the effects of conflicting factors.
Part 4 — The Process of Science (logical + social)
• Criteria for Consensus: One way to help students understand the process of science is to ask, "What evaluation criteria do scientists use when they make decisions about theories and research programs, to reach individual conclusions and community consensus?" Other possibilities include a study of the strategies used by scientists when they design experiments and research projects.
Part 5 — Inquiry Activities in Science Labs
• Principles for Inquiry: How can teachers design inquiry activities — which occur when students “don't know what to do next” so they must think on their own, and are allowed to think — that have an educationally optimal level of difficulty? How much should inquiry be used for lab instruction, and in what ways?
TABLE OF CONTENTS
The order of parts (12345) is arbitrary, so just find a section that
looks interesting, and go there. So far, all examples are from chemistry, but most of the principles for "what can be learned" could also be useful for other sciences.
1. Thinking Skills using Observation-and-Imagination
2. Thinking Skills for Mathematical Data Analysis
3. The Logic of Science (reality checks & more)
4. The Process of Science (logical + social)
5. Using Inquiry to teach Thinking Skills
1. Thinking Skills using Observation-and-Imagination [overview-summary]
Experimental activities can help students
learn to use observation-based logic and make mental connections
between different levels of thinking (macro,
micro, symbolic), and use their imaginations to build mental representations of chemistry concepts. And
while they're doing this, they also learn chemistry concepts. What are the relationships between our senses, the instruments we use, and observations we make?
We observe using human senses (to see, hear, touch, taste, or smell) plus instruments (watch, ruler, scale, pipet, compass, thermometer, microscope, telescope, spectrometer, chromatograph,...) that help us measure more precisely and observe more widely. We translate raw data (from senses or instruments) into observations that we record using symbolic representations that are verbal (words,...), visual (pictures,...), and mathematical (numbers,...). {quoted from An Introduction to Scientific Method}
COMPETING REACTIONS (using
Questions to inspire Active Thinking):
This activity illustrates how a routine minds-off lab procedure can become an exciting minds-on
opportunity for learning.
• THINKING ACTIVITIES: Any experience that stimulates thinking, thus helping students learn a concept and/or thinking skill, is a thinking activity.
• REFLECTION REQUESTS: How many thinking activities will students experience during this lab? If they are in a typical minimal-thinking mode of "going through the motions"
they may not carefully observe what happens when they place solid Zn into a solution with
Cu2+ and H3O+ ions — they can see bubbles for awhile, a blue color in the solution
gradually disappears, a reddish-gold solid appears,... — and even if they are fully aware observers, their observations probably won't promote much
thinking. But when a teacher asks questions (*) — which chemicals are visible
(in what way) and invisible? what is reacting with what to produce what?
is there one reaction or two? are these reactions connected and sequential, or independent and competitive?
which chemicals are competing for what resource? can you write equations
for the net reactions? how do you know when each reaction is complete?
which reaction finishes first? how do you know which reactant is used
up and which is in excess? — this routine task is transformed into a thinking activity with a minds-on mode of awareness, and this helps their lab experiences become valuable
opportunities for learning. {reflection requests ==}
• CONNECTING LEVELS: This lab is a valuable opportunity for students to improve their conceptual knowledge (limiting
reactants,...) and their procedural knowledge in the thinking skills of using
observation-based logic to connect macro-level
observations (bubbles, blue color,...) with micro-level events (interacting ions, atoms, and molecules) and their symbolic
representations (as chemical symbols
and reaction equations).
CONTROVERSY: An interesting twist would be
to cause controversy and stimulate debates by giving groups differing instructions about how much
of each chemical to use, so their answers about "which finished first"
will be in conflict. :< ) I've never actually done this "controversy twist" and it might be more practical if, instead of asking students to DO these other experiments, you just posed the variations (in relative amounts of chemicals being used) as imaginary "what if..." thought-experiments.
USING THEORY: For the reaction(s) they run in lab, students can do calculations to determine whether there is a match between their theory-based calculations
and their reality-based observations, thus doing a scientific Reality Check. { Students can do this comparison for their physical experiments, and — if you give them data that includes the amounts of each chemical, plus observations of what happens — also for some mental experiments. To make things more interesting, you can give them some data where the reality check fails (you may want to tell them that this is possible, or you can just let them discover it) or you can give them only the amounts-of-chemicals and let them make the prediction without any leading (or misleading) from you. }
PREPARATION: Students
can be prepared for this activity in several ways. They can react
copper wire with warm nitric acid, as discussed below. A simpler preliminary,
done as a demonstration in lecture or lab, is to show the gas-producing
reaction of HCl with Mg, along with a reaction equation and an explanation
of the "stealing electrons" oxidation-reduction mechanism. The concept of limiting
reactants can be discussed either before or after the lab.
RECOGNIZING A LIMITING REAGENT BY OBSERVING ITS ABSENCE: Although "observing an absence" seems impossible, students do it. How? When students react Zn with I2 in
aqueous solution, ask them "how can you know when the reaction
is finished?" The
answer is that "it's finished when either the Zn is gone (could we
observe this?)
or the I2 is gone (could we observe this?)" and a key concept is the
importance of knowing what each chemical looks like, so they can observe
whether
it
is
or
isn't
still
present
in
their reaction beaker, and can logically conclude whether the reaction is
or isn't finished (whether the maximum possible amount of reaction has occurred)
and
which
chemical
was
the
limiting
reactant. {x}
ALCOHOL CONTENT OF WINE: In this lab, students use a spectrometer to measure the absorbance of solutions containing alcohol and a reagent (that reacts with alcohol to form a complex) in order to determine the alcohol content of white wine. I ask students, "what color is water? alcohol? wine? reagent? reagent-alcohol complex?" [colorless, colorless, very pale yellow, light yellow orange, bright red] and "which chemical is the limiting reactant?", to help them to be more aware, think about what is happening, and understand it. / This experiment is also discussed later, regarding limited knowledge & asking "does it matter?" & automated subtractions & quantitative calibration logic.
LIMITED KNOWLEDGE ABOUT A NON-LIMITING REAGENT: An
important
"thinking
skills"
concept
— that is a key for two of the reactions above, I2-with-Zn and alcohol-with-reagent — is that if we want to use observations of a reaction to determine the original amount of a particular
chemical, it
MUST
be
the
limiting reagent in the reaction we're using.
COPPER AND NITRIC ACID: Students observe this reaction, and think about questions: Has the copper wire disappeared? Have the copper atoms disappeared? Where are they: in the red-brown gas or the blue solution? Which color most closely matches that of copper? (and is this significant?) If copper is in the brown gas, in what form could it be: copper ions? {but these are strongly solvated by water, so are not likely to evaporate} copper atoms? {but neutral copper forms solid copper metal, not a gas} a copper compound? {but this would be an ionic compound or a metal alloy, and neither would evaporate} When you've considered all of this, what is your conclusion: Where are the copper atoms now? / If copper sulfate (with Cu2+ ions) is available, students can dissolve it in water, observe the solution, and compare this with the solution produced by the copper/acid reaction.
TAKERS AND GIVERS (Halogens and Halides):
First, students observe mixtures of water and hexane and either Cl2
(the hexane layer is clear) or Br2 (this layer is now yellow/orange)
or I2 (it is pink/purple); then they observe the hexane layer
after mixing each of the six interesting combinations of halogens (Cl2,
Br2, I2) with halides (Cl-, Br-,
I-). Based on their observations, students draw conclusions
about trends in reactivity among halogens and among halides.
This activity provides an opportunity
to practice observation-based logic. It also provides an opportunity
to think about the fundamental difference between reactions that involve
neutral halogens (which can react by gaining electrons to become negative
halides) and negative halides (which can lose electrons to become neutral
halogens) but this usually occurs only if questions provide a stimulation for thinking. One
result of this thinking is that students can decide, based on their observations,
what the reactivity trend is for halogens and for halides; typically they
think "Cl is more reactive than Br or I because Cl is more electronegative" but
this is true only for neutral halogens, while the trend is reversed for negative
halides; and
students should be able to explain, by
using
chemistry logic, why each trend should be expected.
Another way to help students "connect
ideas" is to show them a table of reduction potentials,
and ask them to find
the
value for each halogen (F2, Cl2, Br2, and I2 are +2.87, +1.36,
+1.08, and
+0.535 V)
and
find
where the most reactive chemicals are — they are "high on the left" and "low
on
the
right"
so F2 is the most reactive halogen, but I- is the most reactive halide — and
ask whether this agrees with their observations in the experiment.
As usual, students learn more when they
are challenged to think, when a teacher asks questions about what students
are observing and what they can logically conclude. This thinking activity
can be done as either inquiry or confirmation, either before or
after
periodic
trends
in reactivity are studied in a lecture or textbook. Of course,
questions and hints should be adjusted to match the students' foundation
of conceptual knowledge and thinking skills, but the criteria for a "match" will differ in the inquiry
and confirmation modes. {inquiry activities in labs}
A MYSTERIOUS TREND: While they are weighing a beaker containing liquid hexane, students observe the weight steadily decreasing. Is there something wrong with the scale? What is happening? If the objective is to determine an accurate weight, is this a random error or systematic error? What could be done to prevent or minimize the error? Would the error be more serious with 40.00 mL of hexane in a 50 mL beaker or in a 500 mL beaker? / Is a weight-scale reading an observation? How does it differ from an observation made directly with our senses?
What are the relationships between observation and imagination when we "use observation-based logic to make mental connections between different levels of thinking (macro, micro, symbolic) and use our imaginations to build mental representations of chemistry concepts"?
QUESTIONS ABOUT AIR: Students blow up a balloon, cool it in liquid nitrogen, let it warm up, and then discuss thought-stimulating questions: At various stages in the experiment, in what state (s, l, g) is each component of air? (a table is provided, with boiling points and freezing points for N2 and O2) What is missing from this table? {it's a dry-air table, so we can talk about water vapor & humidity and what they know about the fp & bp of water} Is air in the balloon the same as air in the room? {due to their body's metabolism, compared with inhaled room-air the exhaled balloon-air contains more H2O and CO2 but less O2 and the same N2}
CONCEPTUAL PICTURES: Students draw pictures of molecules in two states (liquid & gas) in a flask at different stages of an experimental procedure that lets them explore gas behavior and math relationships between variables: P, V, mass, molar mass, R, T. Drawing lets them experience the process of translating book-knowledge thinking into applied labroom thinking, and shows those who find this difficult (it's more common than I had expected) that one way of thinking doesn't automatically lead to the other. the questions and pictures
CONVERTING PHYSICAL MODELS INTO MENTAL MODELS:
Students construct and observe 3-D physical models
of chemical structures, in order to form their own mental
models. Generally, I think inquiry learning is most useful for helping students learn scientific thinking skills, not scientific concepts, but this lab is a powerful way to help students learn chemistry concepts by first-hand personal experience, by translating their own sense-observations into their own mental-concepts.
During my lab introduction, to emphasize
that this lab is an opportunity for learning, quickly (in 2 seconds!) I draw a crude picture of
a car, and ask students to imagine what this object looks like from the
front, side, rear, and diagonal. When I claim that they can do this
because my drawing is so good, they laugh because it isn't very good.
But it's sufficient to let them to think "car" and from here their
visual memories can take over. They have seen lots of
3-D physical cars, so they've had plenty of practice forming 3-D mental
images of cars. By analogy, in this lab they should take advantage
of an opportunity to practice the art of converting physical images
they can see into mental images they can imagine. They can also learn
how to use 2-D pictures they can see (in a textbook that is available in
lab) as a bridge between 3-D molecular models and 3-D mental images.
During the lab, students work in cooperative
groups, and for each structure (simple cubic, body-centered cubic, hexagonal
closest packing, cubic closest packing, face-centered cubic, CsCl, NaCl,
CaF2, diamond and graphite) they think about questions (about coordination number, repeating patterns, physical properites,
the number of atoms in each unit cell and its relationship to the stoichiometry
of compounds, and more) summarized on a knowledge grid I made, and they discuss these concepts, first with each other and then with me.
And I ask them other questions, such as whether they see a correlation between
coordination number and density, whether it is possible to have a coordination
number larger than 12, and what the term "closest packing" means.
The ionic compounds also offer an opportunity
to review principles about the size of ions, from earlier in the semester,
and to think about concept-based logic. We look at the CsCl structure, composed
of small spheres and large spheres, and I ask them to explain why they might
expect Cl- to be larger {because in an isoelectronic series,
negative ions are larger than positive ions, so Cl- is larger
than K+} and to give a counter-argument for why it should be
smaller {because Cl-, and also K+, has fewer electrons than Cs+}. To help them understand these principles, I show them a visual summary. Then I ask them, "So which is larger?",
and we discuss the ways in which our situation (with principles indicating
that Cl- and Cs+ are both larger than K+)
is analogous to the question, "If Sue is taller than Tom, and Mary
is taller than Tom, who is taller, Sue or Mary?" This naturally
leads to a discussion of conflicting factors and how we can cope with a situation where our logic seems inadequate for
reaching a conclusion. We look at a way to make our principles more sophisticated when instead of just "which is larger?" we also ask "how much larger?" by looking at the relative strength of the conflicting factors: how quickly does the size change with the change of ionic charge in an isoelectronic series, and with the change of electron number in a column of the periodic table. This is part of a "reality
check" using numerical values of ionic sizes (which are themselves the conclusions of scientists based on their comparisons of data from many experiments) in the course-textbook.
Using a similar process of thinking, we look at NaCl (now both factors agree
that Cl- is larger) and CaF2 (again the factors are
in conflict, but now the negative ion is slightly larger because the number of electrons now changes less, so this factor is now less important).
Using principles they have learned in other parts of the course (in lecture and discussion section) I also ask students to discuss and solve
geometry problems involving ionic radii and the length of a unit cell, or
the length of a "regular diagonal" (in 2 dimensions, for an FCC
structure) or a "long diagonal" (in 3 dimensions, for a BCC structure).
They also calculate the densities of NaCl and CaF2,
using math-logic involving the number of each ion in a unit cell, atomic masses
(along with logic about the relative masses of nucleons and electrons, of
atoms and ions, plus the principle of electrical neutrality), Avagadro's
Number, and the length of a unit cell.
2. Thinking Skills for Data Analysis [overview-summary]
With experience, I've become more convinced
that almost all students need a much better understanding of the ideas-and-skills
used in data analysis. For example, most college-entering students initially:
• don't always include UNITS in their data,
and don't realize why this is a serious error.
• don't understand the differing strategies
that are used for multiplication-or-division (where sig figs are
used) and addition-or-subtraction (where decimal columns are used); or
they don't "match" the decimal columns after they have calculated a deviation,
by (for example) reporting a density as "1.046 ± .0026 g/mL"
instead of "1.046 ± .003 g/mL" with both to the nearest .001
g/mL.
• don't realize that significant figures are a simplistic measure of precision,
often useful but not sophisticated , so they overestimate the statistical
significance of significant figures; the utility of other statistical
criteria is illustrated by a situation where students should
"break the rule" for sig figs and calculate density to 4 sig
figs when they divide "9.87 g / 9.73 mL" to
get 1.014 g/mL, even though their "sig fig rule" indicates
that only 3 sig figs are justified, because in this case percent error
(which justifies the use of 4 sig figs) is a better measure of precision than
sig figs.
• don't appreciate the difference between
4, 4.0, and 4.00, regarding what is being claimed: "4" is
a humble claim that the result is between 3.5 and 4.5 so it's rounded to 4,
the nearest whole number; but "4.00" confidently claims that the result
is between 3.995 and 4.005, with rounding to the nearest .01; but 4.00 claims only that the observation should be rounded
to .01 and this value should be used in subsequent calculations, not that the result is necessarily accurate to .01, or is precisely
reproducible to .01.
• don't re-calculate concentrations, based
on the actual amount of chemical used; for example, if they are told
to make 100.00 mL of .08 M solution from CuCl2•2H2O
and they calculate that 1.3638 g is needed, if they actually weigh out
1.3814
g they must re-calculate the actual concentration as .08103 M, not .08000
M;
in this experiment, students now make a graph by Excel (not by hand drawing,
as in previous years) and for a computer .8103 is no more difficult than
.08000
/ In another lab, when they use a Mohr Pipet, students see why a
7-column table is helpful. {x}
• don't understand the distinction between weight & mass, and why a scale measures weight but — if we make the logically justifiable assumption that in "(weight) = (gravity constant)(mass)" the gravity constant is constant and has not changed after the weight-to-mass conversion has been determined using calibration logic — we can convert observations of weight into observations of mass. And we should explain why it's wrong to say "the molecular weight of helium is 4.03 grams/mole."
ANALYSIS OF UNCERTAINTIES & ERRORS
To
help students learn the fundamentals of mathematical data analysis, I've made
two handouts for students to do as homework.
The first
handout [with key available in late 2012] has one main theme; students use data that is provided (for mass & volume, with uncertainties estimated for each) to calculate density and — by using the uncertainties and imagining "worst case scenarios" — they estimate the extremes of possible values for density, which range from a minimum-value to a maximum-value on both sides of the center-value. This
exercise-in-thinking illustrates the logical reasons behind the mathematical rules for processing
uncertainties (by + and –, x and /), and the differences between absolute errors
(used
for + or -) and relative errors (for x or /). / This handout ends with another idea, for logically thinking about the range of melting points for metals. { I.O.U. – When I find the combo pages that have both typing and handwriting, not just the typing that's on the two files posted here, the "missing arrows" will be drawn on the right side. }
The second
handout [with key available in late 2012] contains a variety of questions and problems
about precision-and-accuracy, significant figures, finding standard deviations
(by
using an equation, and using their calculator's "statistical" mode),
strategies for identifying and handling "outliers" in a data
set, deciding if an error is random or systematic, and retroductively curve-fitting
data sets by using nonlinear relationships (logarithmic, square root,...).
This doesn't cover everything in analysis of random errors
(and neither does the rest of the section) but it's a beginning to build on by asking "what other data skills will be useful for students?" and "how can we teach these thinking skills more effectively?"
DATA ANALYSIS and EXPERIMENTAL DESIGN
Continuing the list above — but with ideas & skills that are especially useful for experimental design — most students initially:
• don't think carefully enough about the
glassware they're using; thus, they sometimes measure volume using a
standard beaker (that is ± 5%) without realizing the lack of precision;
• don't know how to use equipment (especially
glassware) correctly; or they understand, but are not careful enough
in making their observations because they adopt a "close enough for gen chem"
attitude; in these situations, when talking with students I often acknowledge that
it really doesn't matter much (unless a lab makes them responsible for precision/accuracy
by having
them find the value of a quantitative-unknown) but I ask them to imagine themselves
in a situation where it really does matter, where they are in a science research
lab, a CSI forensics lab, or in a medical lab where the health of patients
depends on the accuracy of their results.
• don't appreciate the
value of LARGE NUMBERS when collecting experimental data; in one thinking activity I ask students to calculate the errors in calculated density using "worst case scenarios" for data with large numbers (error = .007 g/mL) and small numbers (error = .053 g/mL); in another
activity, I ask whether a 1 mL Eppendorf Pipet must
be more precise than a 10 mL Volumetric Flask, to have the same
relative error in each measurement. {Yes, the pipet must be 10 times more precise,
by having 1/10 of the absolute error.} {x} / The value of large numbers is one principle of Experimental Design that can be learned from the "fish mystery" program – although there might be reasons (re: cost, kindness,...) for using-and-killing fewer fish.
• don't ask themselves, often enough and
with sufficient skill, "does it matter?"; therefore,...
In one "thinking skills activity"
— motivated when I noticed that many students don't understand when
it's important for glassware to be initially dry, so they're either too careful
(when it doesn't matter) or too sloppy (when it does matter) — I ask
whether 1 mL of water that's initially in a 10 mL volumetric flask will cause
an error in 3 situations they have encountered during the semester:
it makes a big difference (10%, as discussed above in if-then logic for data analysis) when they find the density of a sugar solution; it makes no difference when the flask is used for dilution, because
they eventually add water in "filling to the line" anyway;
it makes a small difference when they measure the absorbance of a red
complex (formed from alcohol and a reagent, and used to determine the amount of alcohol in wine)
for reasons that I won't describe here. And if a cuvet (used to measure absorbance) is not dry, if it
has not been rinsed with the solution whose absorbance they are measuring,
this would also cause an error, due to dilution of the sample.
In their first lab of the semester,
during a "cumulative
weighing" students see another example where "dry" matters
in one way but not in another way —
"The INSIDE of your beaker doesn't need
to
be dry
initially in
Part B [when they do the cumulative weighing], but the
beaker's OUTSIDE (especially the bottom) should stay dry, and (this is
very important for all data collected by everyone in lab) the top of the
balance-pan should stay dry. Do you understand why ‘initial
water’ inside the beaker doesn't matter, but if you then get water on the outside of
the beaker, this will cause experimental error in your data?" — and this
why-question
converts a potential opportunity (to use a thinking skill) into an actual thinking activity. {x}
In another "does it matter?"
thinking activity, I ask whether it would be acceptable (without causing error)
if a particular Eppendorf Pipet consistently delivers a precise 1.175 mL (instead
of the 1.000 mL they expect) when they are using calibration
logic by "doing the same thing" to samples, first with knowns (to
make a calibration graph) and then with unknowns (to use the calibration graph). As a way to encourage flexible creative thinking about experimental design (what if you could change the design? can you change some aspects of it within the structure imposed by instructions in the lab manual?) we can ask "in what situations would the difference (between the expected 1.000 mL and the actual 1.175 mL) lead to error, and in what situations would it not lead to error and would thus be acceptable?
Then I ask,
"How do you know if an Eppendorf Pipette is consistently precise, and (a
different question) if it's accurate?" Students can answer these
questions by doing calibration experiments if they know the density
of a liquid (like pure water, with d = .9982 g/mL at 20 C) and they repeatedly
deliver "1 mL" into a beaker, record the weight after each delivery,
and then analyze the data. In a similar way they can check the reproducible precision and accuracy of several 10 mL volumetric flasks, to compare their
own analyses with claims made by the manufacturers of these pipets and flasks. This type of verification thinking is useful for experimental design.
IF-THEN LOGIC FOR DATA ANALYSIS
This logic is useful for designing your own experiment, or analyzing data in an already-designed experiment from a lab manual.
Students can weigh a 10 mL volumetric flask, fill it with a sugar solution, then weigh it again. They their data plus an assumption about the flask — "(final mass - initial mass) / (10.00 mL)" — to calculate density. As a bonus question, I ask students to
"Imagine that you know your volumetric flask begins with 0.40
mL of water on its bottom-and-walls (instead of being clean & dry) and,
ignoring this knowledge, you calculate your solution density as 1.034 g/mL.
What is the "corrected density"? (i.e., what would the density be
if you had begun with a flask that really was clean and dry) Finding this correction
requires an if-then comparison of the actual/wet versus ideal/dry, in dual thought-experiments where one aspect of the experimental system (initial mass) changes from one experiment to the other.
To make it easier for students — and a teacher can decide how much of the following questions-and-hints to use for adjusting the level of inquiry-difficulty — a teacher can suggest that students ask themselves: what is really happening? if .40 mL of water was initially present, did we really add 10.00 mL of sugar solution? if not, then how much did we actually add? and how should we therefore calculate the actual density (after correcting for the systematic error of .40 mL)? what is this value, and how does it compare with the original value you calculated? was the original uncorrected value too high or too low? by what percent?
Or, for a hint that is less obvious, ask which of the equation-variables (initial mass, final mass, volume of solution) they want to focus on (and think about changing) when they're using the logic of asking "what if" followed by "if..., then...". They have a choice, and their decision makes a difference, as you can see in these two if-then calculations (Method #1 and Method #2, which both assume that a clean-and-dry flask has a mass of 40.00 g) to correct the error:
in #1, the corrected density is (50.34 g - 40.00 g) / (9.60 mL) = 1.077 g/mL
in #2, the corrected density is (50.34 g - 39.60 g) / (10.00 mL) = 1.074 g/mL
I think the first correction, by changing the solution-volume from 10.00 to 9.60, is conceptually easier, and (more important) it's also the proper way to make the correction. I think the second correction, by changing the initial mass of the solution from 40.00 to 39.60, is conceptually more difficult, and the "correction" is incorrect. Why? Because it ignores the fact that the .40 mL has diluted the sugar solution so they were not really adding 10.00 mL of their actual-strength solution, instead the result was 10.00 mL of diluted solution with lower density, which (in their incorrect if-then scenario) would appear to have a density of 1.074 g/mL instead of its actual density of 1.077 g/mL.
AUTOMATED SUBTRACTIONS:
Sometimes a machine can perform part of the data analysis.
In one mini-activity, students weigh a block in two ways: 1) by weighing the beaker, then beaker+solution, and substracting to get solution; 2) by using the taring mechanism of the scale, which defines the beaker's weight to be "zero", then when a solution is added to the beaker this extra weight "above the zero-level" (which is the solution's weight) is displayed on the digtital readout, so an arithmetic calculation is not needed because the machine (the weighing scale) did the arithmetic.
Later in the semester, the analogous concept
of a blank stimulates thinking about the logical
functioning that is designed into spectrometers. Students put a light-orange solution into the spectrometer, which defines the absorption of this orange solution (i.e. of the air, cuvet, water solvent, and orange solute) to be "zero", then when a small amount of colorless alcohol solution is added to the orange solution, all of the alcohol forms a red complex with some of the orange solute, to make a red-plus-orange solution, and the extra absorption "above the zero-level" (due to the red complex) is displayed on the digtital readout, so an arithmetic calculation is not needed because the machine (the spectrometer) did the arithmetic.
These automated subtractions are analogous. In each case
the machine is designed to "subtract off" what you have defined
(by pushing the tare-button or blank-button) to be the "zero" amount of mass or absorption; the result of this automated subtraction is the "extra amount" due to the solution-weight or red-absorption, in the examples above. The arithmetic being done by the machines is:
W (beaker + solution) – W (beaker) = W (solution),
A (orange + red) – A (orange) = A (red),
and "what
is subtracted" can be seen more clearly when the arithmetic is organized vertically in columns:
|
|
technical note: As a way to encourage students to think about systematic errors in the experimental design, we can ask "what assumptions have been made in using the orange solution as a blank?" and "are these assumptions justified?" / Students measure the absorbance of the red complex they make by combining 1.00 mL of colorless alcohol with 9 mL of the orange solution to make 10.00 mL of resulting solution. When they use the orange solution as a blank whose absorption is defined to be zero, they are assuming that alcohol is the limiting reactant so all of it is converted into the red complex, and most of the orange excess reactant remains unreacted and thus remains orange, and its dilution (from 9 mL to 10 mL) can be ignored; overall, they are assuming that the systematic errors caused by these simplifying assumptions can be ignored because these errors are not significant.
ESTIMATING AMOUNTS
Here is a thinking
activity that would be useful to help students
develop an intuitive feeling for "how much" and for
the size of metric units; the second objective (re: metric units) is unfortunately
necessary in the United States because we're the only non-metric
major country in the world. For
various objects, students could measure amounts (mass,
length, volume) in metric units (g, kg ; mm, cm, m ; mL, L) and convert these amounts
to American units (oz, lb ; inch ; fluid oz, pint); then they would estimate
amounts (mass, length, and/or volume) for various objects, as individuals
(first) and in groups (to "negotiate" about their differing estimates),
with competitive
games to see which students (or groups) can make the best
estimates.
an option: This can also be done for ratios,
like density, although "supplied data" may be necessary to make this practical. Or,
when estimating densities, you can ask students to use their own observations
(from the past) in a variation of the game
asking "will it float?" on David Letterman. { By the way, will a bowling ball float? The answer is yes-and-no. Why? hints: Do all bowling balls have the same diameter? the same weight? (bowling ball specifications) }
3. Logical Thinking Skills used in Science [overview-summary]
Students should have
opportunities
to use many different kinds of scientific logic in labs, including all of these and more:
HYPOTHETICO-DEDUCTIVE LOGIC
In science, an especially
valuable thinking skill is the hypothetico-deductive (HD) logic that
is the foundation of scientific method. Here are four activities involving
HD reasoning.
• A written handout explains
the basic principles of mass spectrometry, provides mass-spec graphs for students
to analyze for
practice, then asks them to use another graph to determine the structure
of a C3H7Br compound. To solve this problem, students
must use HD logic: invent competitive theories
about the structure (i.e., use their imaginations to invent two structures
that are consistent with the principles that C forms 4 bonds, while H and
Br each form 1 bond); use each theory to predict the corresponding
graph;
compare these two sets of if-then predictions to see where they differ, to
find (within the graph-data provided for them) a crucial
experiment that can distinguish between the two structure-theories; do
a reality
check by observing the graph; compare these observations
with the predictions from each of the two competing theories (for the structure
of CH3H7Br), and draw a conclusion. Very few students have been able
to finish the entire process of HD logic, even after they were given an
explicit
step-by-step procedure for what to do first and what to do next until they
could reach a logical HD-conclusion. Obviously, students need more
experience with this thinking skill that is the foundation of scientific
method.
• A computer lab (asking "what
is causing the fish to die") is intended to give students experience in
constructing a theory and testing it, but the constructing-and-testing is trivially
easy, so
(unlike
the mass-spec problem above) this fish lab doesn't provide
a useful experience with H-D Logic. But it is useful for teaching
other ideas-and-skills, including Experimental Design.
• To help
students experience the concept of a crucial experiment (as described above), when students are looking at movies
of reactions and using calibration logic, I ask them (as in
the mass-spec lab above) to "explain
how you can distinguish between copper sulfate and copper nitrate" by
finding a crucial experiment (*) that allows the use of tie-breaker logic to distinguish
between
the two blue solutions, to let you decide (for your blue "unknown solution")
whether it is copper nitrate or copper sulfate. * This experiment is reacting the unknown solution with barium chloride, which lets you conclude that it's copper sulfate (if a precipitate forms) or is copper nitrate (if it doesn't).
• Students can gain more experience with HYPOTHETICO-DEDUCTIVE LOGIC when — by using supplied data for the wavelength at which each of 3 solutions has maximum absorption, and a color wheel —
they develop
a theory to
explain why a particular color is observed for the first of three solutions, and then test their theory by
applying it for the other two solutions. {x}
Scientific reality checks are the main theme in the first part of my Introduction to Scientific Method. And a summary-overview of scientific logic is part of my model of Integrative Scientific Method — especially in Sections 1 (Hypothetico-Deductive Logic & Empirical Factors in Theory Evaluation), 2 (Conceptual Factors in Theory Evaluation), 4 (Theory Evaluation), 5 (Theory Generation), 9 (Creative-and-Critical Thinking).
IF-THEN THINKING for Data Analysis
To correct for a known error, scientists can use If-Then Analysis of Errors by comparing what should have happened with what actually happened. This is an especially useful skill for analysis of systematic errors during experimental design.
THE LOGIC
OF LE CHATELIER
• In another opportunity for hypothetico-deductive
experience, students think about the shifts in equilibrium amounts of complex ions
(as shown in the reaction below) that occur when during lab they cause shifts by adding chemicals or changing temperature.
[Co(H2O)6]+2 + 4 Cl- --> [CoCl4]-2 + 6 H2O
First, students prepare and observe the complex ions: cobalt with only water (pink) and cobalt with added chloride (blue). Then, beginning with cobalt in water, they make a series of changes, shown by arrows in the diagram below. Before each change, they use Le Chatelier's Principle to predict the shift in equilibrium amounts (no change, to the right, or to the left) and circle the appropriate symbol in the PRED column. Then they use observations (is the color pink, blue, or an intermediate purple) and logic to estimate the relative amounts of left-side species (L) and right-side species (R) at each stage of the sequence (before and after every change) and in the bottom row they mark each equilibrium position. { For example, a mark is placed far to the left on the L-R bar if the "after HCl" solution is pink, in the middle for a violet color, 3/4 to the right for violet-blue, and far to the right if blue. } Based on their logically interpreted observations, they determine the observed before-to-after shift, mark the OBS column, then compare their predictions and observations.
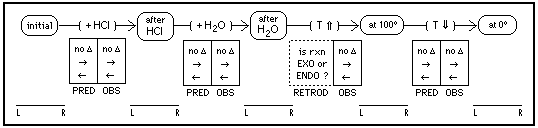
For the temperature increase to 100 degrees, students cannot make a prediction because they don't know the reaction enthalpy. But after observing the equilibrium position (shown in the bottom row) before-and-after, and determining the shift in equilibrium, they can use the logic of retroduction to infer whether the enthalpy is exothermic or endothermic, and mark this in the RETROD column. Then they can predict the equilibrium shift for the next change (when T drops to 0 in an ice bath), observe the before and after states to determine the actual shift, and compare predictions with observations.
Many concepts and thinking skills can be learned in this lab. But without the diagram — which I developed to explicitly promote logically organized hypothetico-deductive thinking — most students will miss many of these opportunities for learning.
CALIBRATION LOGIC
Basically, calibration logic uses inductive logic by assuming that "what happened before will happen again, if the situations are similar," so we can use old knowledge (about knowns) to generate new knowledge (about unknowns).
The idea of calibration can be applied in a variety of ways, spanning a wide range of applications, as you can see in the many places throughout the page that link to this section.
1 — Quantitative Calibration Logic
I.O.U. — I think this topic is interesting and important, but what I've written about it should be condensed, maybe by focusing on 1e, epistemology (in a shorter version), 2a-2b, and Comparing the Logics, with the other parts being moved into the end-of-page appendix. Eventually (probably in early 2012) this will happen.
1a. Making and Using a Calibration Graph: We could ask students to imagine a low-tech weighing scale, such as a small basket (into which we can place weights) attached to a spring hanging from the ceiling, and a meter-stick on the wall so we can define the basket's vertical position as its scale-reading; and we have several blocks that have been standardized so we know their masses are .100 g, .200 g, .300 g,... Step 1: We give students data — when the basket is empty the reading is 84.7 cm, and with a .100 g mass it's 79.5 cm, and so on — and ask them to draw a calibration graph that will calibrate the scale. Each point on this graph requires two pieces of connected information (e.g., if x = .100 g, then y = 79.5 cm) and when they draw a curve to fit the data (we give them data that is non-linear, and tell them it might be a non-Hookean spring so they should not assume linearity) this best-fit curve is a "visual summary" for all of the data. Step 2: We ask students to determine the mass of an object, if when it's weighed the reading is 68.3 cm. How can students do this? A teacher can explain the “over and down” technique, or (to convert this into an inquiry activity) just say "do it" and let students figure it out, or can become a discussion leader who asks "what do you think? how can you find the mass?" and coaches them into discovering the technique. / Can the two steps be reversed? { Although data can be collected in any order, a graph must be made (Step 1) before it can be used (Step 2). } / If you want, you can skip down to 1e, since 1b-1d are just variations on the main theme of 1a.
1b. Calibrating a Scale: In another activity, students could observe the readings on a high-tech digital scale when known masses (.100 g, .200 g, .300 g,...) are placed on it. Students can do hypothetico-deductive reality checks: If the scale is accurate, we expect its readings to be .000 g (with no mass on it) and .100 g (with a .100 g mass on it) and so on. What should they conclude if their predictions don't match their observations? If the scale reads ".103 g" when the .100 g mass is on it, we can ask students: “Which do you think is wrong, the scale (saying .103 g) or the mass (claiming to be .100 g)? What do you trust more, the scale or the standardizing?” { There is no "correct answer" for this epistemological question asking "how can we know" although external data could help us decide which is more trustworthy. } / Or this activity could be run as a mental experiment (a thought experiment) instead of a physical experiment, by giving students data about scale-readings when its pan is empty and when masses (.100 g,...) are placed on it.
1c. A Two-Part Calibration Strategy: Or we e can ask students how to calibrate a new scale if they have no standardized masses, but they do have an old scale that is assumed to be accurate. They can do this problem as a physical experiment if you provide scales, or as a mental experiment if you provide data: for example, tell them that the old scale's readings for five objects are 40.3, 49.9, 60.2, 70.1,
and 79.7 grams; and for the same objects the new scale reads 38.5, 47.2, 57.0, 67.8, and 79.0 grams. When we use the new scale again, several times, its readings are always the same (38.5, 47.2,...) so measurements on the new scale seem reliably reproducible, but we don't think they are reliably accurate. At the beginning the five objects had unknown mass, but if we trust the old scale we can use it to "standardize" the masses and make them known; at this point the situation is similar to the beginning of 1a or 1b, so students can make a calibration curve for the new scale (because they know that when x = 40.3, y = 38.5, and so on) and then use an over-and-down to find the mass of a new object.
1d. Calibrating Glassware: In the final activity for this set of 1a-1d, students can use the definition of "density ≡ mass/volume", and assume that the density of de-ionized water (same as density of pure water? .9982 g/mL at 20° C) is known, and that we have an accurate scale so the mass of water is known. By using these two knowns — density (= .9982 g/mL) and mass (from the scale) — we can rearrange "d ≡ m/V" to "V = m/d" and calculate volume, and thus check the claims for volumetric flasks by calculating the change of mass when an initially dry flask is filled to the mark with water; for an Eppendorf pipet, students can check reproducible precision and also get larger numbers by measuring a cumulative weight, by repeatedly delivering "the amount" to a beaker that is being weighed. / Questions about the precision & accuracy of glassware are important when we are thinking about data analysis and experimental design.
1e. Two Ways to Use a Linear Calibration Graph: In a variety of labs (for example, to find the
sugar
concentration
of
a soda
sample, the concentration of alcohol in wine, and the mass-% of copper
in a
compound), students make several measurement for a characteristic
of known samples
(so they can
generate
a calibration graph) and then measure the same characteristic for an unknown sample. In each of the three labs we assume linearity; for sugar in soda perhaps this is not justifiable, but for the wine and copper
it's theoretically justified by Beer's Law. / Students assume linearity and therefore draw a best-fit line, and then
use two techniques to move from an observed y-value (for the unknown) to a graphically determined
x-value (for the unknown): 1) they do an over-and-down by drawing a horizontal
line rightward from y, and where it intersects the best-fit line
they drop a line straight down to find the corresponding value of x; 2) they substitute y into the equation for "y = mx + b" calculated
by
Excel,
and
solve
for x. For each procedure I ask students to show me their work: for #1 they draw a tick-mark on the y-axis and label it with the initial y-value, and show the "over" line and its intersection with the best-fit-line, and the "down" line, then another tick-mark and the x-value that is their conclusion; for #2 they show their arithmetic setup by writing "y = mx + b" in 4 versions, first with only the letters, then partially filling it with values (from Excel) for m and b, then substituting their initial y-value (of course it's the same as in #1), then their calculation of x. When students compare the x-values that they find visually (with over-and-down)
and mathematically (with y = mx + b), this helps them understand that the two techniques (visually using over-and-down, mathematically using the equation of a line) are two equivalent ways to use the same graphical information to make the same graphical calculation. These two techniques are outlined in Steps 7-9 of that, in Steps 1-6, gives detailed directions for making graphs (in 2008) by using Excel. {x}
two graph-making skills, manual & computerized: Modern students should know how to draw graphs using a computer program. But if you also want students to have experience with drawing and analyzing graphs, give them graph paper and ask them to plot the points, estimate a best-fit line, and determine values of m and b for the linear equation. I ask students to "show their work" for calculating the slope: circle their initial point & final point, write "m = [yf - yi] / [xf - xi]" and substitute the 4 numbers for their 2 points, show the subtraction results for the fraction-top & fraction-bottom, and then divide to get m. After they show me the m and b from their graph, they enter the data into a computer program and let it compute m and b. Then they compare the "y = mx + b" they get by drawing, and with a computer.
1f. Using Calibration Logic for an Equation: During a calorimetry lab in another course*, calibration logic is used in a different way. Instead of making a calibration graph (as in 1e), students use an equation (as in 1d) based on a definition, "Efficiency Factor ≡ (observed heat) / (actual heat)". This 3-variable equation is used in the usual way (substitute numerical values for two variables, and solve for the third) in two ways. In their first calorimetry run, for methanol, the two known-variables are the "actual heat [generated by combustion of methanol]" because it's given to them, and they know "observed heat [for this reaction]" by calculating it based on their own observations, so they can calculate the unknown, the Efficiency Factor for methanol. Then they assume that this known Efficiency Factor (which depends on geometry, so they try to keep the geometry constant) will be the same for later runs, for the combustion of ethanol, propanol,...; their second known is the "actual heat.." based on their observations, but now the unknown they solve for is the "actual heat" for ethanol, or propanol,... / Here is a summary-review for how students use the 3-factor equation: in all runs, they get "observed heat..." from their lab data; in the first run, "actual heat..." is known (it's given to them) so they can calculate methanol's efficiency factor; in later runs, they assume this efficiency factor is a constant so they can calculate "actual heat..." for the other alcohols. / * The course is Chemistry 108, "chemistry in context" with applications for nuclear radiation & environmental issues & human physiology (cancer, suntan/sunburn, nutrition,...) & plastics & biopolymers & more, developed by Cathy Middlecamp.
Calibration Logic and Epistemology
How can we know? Discussions about knowns & unknowns can lead naturally to questions about epistemology when we ask "how can we know something?" when we are using knowns to calibrate unknowns? General epistemological questions are examined, in the context of a relevant application for chemistry labs (asking how the "accepted values" in a CRC Handbook have become accepted) in Section 4, Thinking Skills (logical and social) in The Process of Science. And here are some specific comments "how do we know" for calibration logic:
In 1a and 1b we use blocks with masses (.100 gram,...) that are assumed to be known. For the low-tech weighing scale in 1a, we have no expectations, so we just draw the calibration graph and use it. But we do have expectations in 1b, using an impressive high-tech scale that is shiny with a digital display, is obviously engineered, is manufactured with a product number and serial number, and (unlike in 1a) it clearly claims that "this object has a mass of ___ grams." Due to all of this, we tend to assume that the readings of a high-tech scale are accurate; but we must simply "accept by authority" a claim by standardizers (and we don't even know who they are) that the block is .100 gram; if we're impressed by technology, this gives an advantage to the impressive scale in an epistemological debate where there is a clash of claims, which occurs when one says "it's .103 gram" and the other says "no, it's .100 gram". Or does the simplicity of the block (with no moving parts!) give it an advantage?
1f uses a 3-variable equation in two ways, by assuming "actual heat" is known in the first run, and "efficiency factor" is known for later runs. In 1d we also use a 3-variable equation, and assume "density" is known so we can use "d ≡ m/V" to solve for the unknown V. But in the first lab of 1e we assume V is known (by assuming the accuracy of our glassware) so we can solve for the density of deionized water (which we assume is almost-pure water) and also standardized sugar solutions (which we assume have been made properly in the stockroom) and sodas (which we assume have not been diluted). In both 1d and 1e we assume the accuracy of our weighing scales, which was the focus of skepticism in 1a-1c.
In 2a below, we assume the solutions contain the chemicals they claim to contain, and
assumptions about interpolation: In the calibration graph for 1a we assume that between plotted points (based on observations) the curve has a "smooth" shape instead of being wiggly like a roller coaster. And usually we assume that because the best-fit line (or best-fit curve) is an "average summary" for all of the data, the best-fit line/curve is more reliable than the individual points. But students often have the opposite intuition, if they place too much confidence in individual graph-points. This is evident, for example, when students "connect the dots" with lines to make a zig-zaggy graph instead of a straight line (or smooth curve), or when they calculate a slope by choosing graph-points that are not located on their best-fit line.
interpolation and extrapolation: We may feel less comfortable about interpolation when the initial value for an over-and-down is near the middle of a curve, not near the ends. And we usually feel even less comfortable when the initial point begins outside the range of plotted points, so we must extrapolate beyond the range of our observations.
2 - Qualitative Calibration Logic
2a. Flame Tests: Students can use qualitative calibration logic by doing
flame
tests
for
solutions
— of LiCl, Sr(NO3)2, KCl, CaBr2, and NaNO3 — and using logic to decide which chemical (assuming the cause is a single species)
produces each color. In
a
second
run,
students
do
flame
tests
on
unknown solutions, and determine
the (probable) identity of an unknown chemical by using their observations plus calibration
logic.
Here are some questions we can ask students:
How can we know? — In your detective work
on the solutions, what assumptions did you make? { e.g., Is the stockroom
telling us the truth with their bottle labels? This is analogous to assuming,
in the earlier quantitative example, that the old scale was accurate. For each experiment,
when declaring something "known" what assumptions are we making? }
Is a color being caused by the negative ion or positive ion? Students could investivate this by changing one ion in a compound, for example by testing K+ with different partners (KCl, KBr, KI, KNO3,...) and Cl– with different partners (KCl, LiCl, NaCl, Mg2Cl,...). A deductive conclusion
about causality is impossible,
but a "very high confidence" inductive conclusion
(that the
metal
ion causes
the color) can be made rationally, using scientific logic. This could lead to questions asking "why are these experiments useful?" and principles for experimental design using the logical guidance provided by strategies such as Mill's Methods of Logical
Induction, which are summarized in Wikipedia and are commented on by me, regarding their uses in experimental design (look for "To facilitate the collection and interpretation of data..." and the other 3 locations that are found in the pdf-search for "mill's").
Can "if-then logic" be reversed? — Does
a violet
flame prove that the solution contains KCl? { No, because another chemical (not K+ ion) might be causing the violet flame. } This possibility illustrates the asymmetry of if-then logic — "if
KCl, then violet" is
not
the same as "if violet, then KCl" — which is an important logical principle. Could
we
ever
conclude with certainty that "if violet, then K"? What
additional information would be needed? Is certainty possible in science? is
a high degree of confidence possible? If we knew (somehow) that
the unknowns contain only Li, Sr, Na, K and Cu cations, and only Cl anions, could we be certain that the purple-flame solution
contains K?
If students observe a flame that is red and violet
and green,
what can they conclude? { That we shouldn't make unwarranted assumptions which require unwarranted restrictions on theorizing. In
this case, is it justified to assume that a solution always contains ONLY one
metal
ion? }
Are scientific conclusions always correct? — In a controlled situation where solutions contain only Li, Sr, Na, K and Cu ions, does
a yellow-orange flame always indicate Na+ in a solution? In principle, based on logical principles we can say "yes" with certainty, but in reality,... If
students don't clean their wires properly, Na from a previous test might "cling" to the wire, and this contamination can cause a yellow flame even if the solution being tested does not contain Na, or has only a tiny negligible amount. { This provides
an opportunity to discuss the concept of a false positive result,
and to ask what a false negative result would
be. }
2b. Reaction Videos: Instead of a detective lab where students physically run reactions and make observations, they can use a computerized exercise where they watch videos of reactions and make observations. The context of experience has changed, because now students observe reactions in videos instead of in lab, but the qualitative calibration logic is similar, and so is the importance of crucial experiments.
Comparing the Logics — Quantitative Calibration versus Qualitative Calibration
After students have done experiments using quantitative calibration (as with scale-weighings) and qualitative calibration (as in flame tests) they can compare these two types of logic. During
the "known run" and "unknown run" in each experiment, what is constant & what is changing? How are we using "calibration logic" in each experiment? In what ways are these two types of logic similar? and how are they different? { This lets
us discuss the usefulness and limitations of analogies. }
ANALYSIS OF CONFLICTING FACTORS
This situation occurs often in science, so students
should have experience with it, and they should know that scientists develop
criteria — mainly the observation-based "reality checks" of scientific method but also theory-based calculations — for coping with these situations by estimating the influence of various factors.
Many lab experiments involve conflicting factors (and you'll see them
here later, when this section is developed more fully) but the only two currently
written up are in ionic sizes earlier, and below in EXPERIMENTAL DESIGN where you'll see two examples — temperature change in calorimetry, and the different requirements of calculating and graphing — where compromises are necessary due to conflicting factors.
EXPERIMENTAL DESIGN
This is a valuable scientific skill. Although the generation-and-evaluation of theories, guided by reality checks, is the foundation of scientific progress, the generation-and-evaluation of experiments is probably more important in the everyday lives of most scientists.
Random Errors & Systematic Errors: Students
should know the causes & characteristics of both kinds of errors, and their similarities & differences. By analyzing some of the experiments they're
doing in lab, students can better understand WHY it's important to design an experiment to minimize systematic errors and to keep random errors within reasonable limits, and HOW they can achieve both goals. They should understand how to make estimates of random errors (this is more difficult than it seems, and is rarely discussed in labs) and try to explain WHY the calculated numerical values in their class span such a wide range (typically it's wider than would be expected based on uncertainties in the glassware and equipment they are using), and do arithmetic with random errors; they should be able to recognize systematic errors and know how to make mathematical corrections for systematic errors by using If-Then Logic for Data Analysis. As explained earlier, "Data Analysis (re: accuracy & precision,
random errors & systematic errors, and more) is also an important factor
to consider in Designing Experiments."
Systematic Errors & Conflicting Factors: In a calorimetry lab, if students use coffee cups for insulation, we can ask students about the advantages & disadvantages of various experimental designs. For example, what temperature increase should they aim for? And why? What bad things would happen if a solution
began at 20 C and the T-change was 90 C, or 70 C, or 1 C ?" They
know the water will boil if T rises to 110 C after an increase of 90
C, and (especially if there are pockets of higher T due to uneven mixing) the cups
might even melt; with
a 70 C rise (and good mixing) the water won't boil, but the heat-insulation
will not be satisfactory if there is a 70 C difference between water (inside
the cup) and air (outside the cup) so their zero-sum assumption (that "Qreaction
+ Qsolution = 0") isn't valid, and they'll get bad data; by
contrast, if the T-change is 1 C the insulation will be acceptable, but
(with a thermometer that only reads to the nearest .1 degree) their precision
(the relative error) will be low because they are not using large numbers (for example, a .2 degree error in "Tfinal - Tinitial" is a 20% error if
T-change
is
1
C,
but is only a 2% error if T-change is 10 C). / To
have good insulation the T-change should be small, but to have a low relative
error the T-change should be large; the
suggested range of 5-10 C is a compromise, in an effort to find an optimum
balance between these two conflicting factors.
There
also can be a compromise due to conflicting factors in a lab to determine the density of sugar solutions. If students calculate density in two ways, arithmetically and graphically, there will be a conflict between designing the experiment to generate large numbers (these are ideal for an arithmetic calculation, for dividing mass by volume to find density) or to generate a range of numbers (this is necessary for accurately determining density from the slope of a mass-versus-volume graph). The basic principles are to use large numbers for arithmetic calculation, a range of numbers for graphical calculation, and a compromise if you want both.
Ideas from throughout this page can be useful in Experimental Design, and...
...here is an I.O.U. — Experimental Design is extremely important in science, so it deserves more attention than you see above. By contrast, parts of Calibration Logic (which currently is the biggest subsection in the page!) probably will be moved into an appendix.
A summary-overview of experimental design is part of my model of Integrative Scientific Method — especially in Sections 6 (Experimental Design), 7 (Problem-Solving Projects), and 9 (Creative-and-Critical Thinking).
4. Thinking Skills (logical and social) in the Process of Science [overview-summary]
My model of Integrative Scientific Method examines the process of science, especially in Sections 7 (Problem-Solving Projects), 8 (Thought Styles), 3 (Cultural-Personal Factors in Theory Evaluation), and 9 (Creative-and-Critical Thinking). And you can compare the problem-solving strategies used in Science and Design.
Here are some possibilities: The questions below, and others that can be planned or improvised, offer many opportunities for learning about the logical-and-social process of science, and the strategies (for asking-and-answering questions, and solving problems) that are used by scientists. For a teacher with knowledge, imagination, and enthusiasm, many types of discussions (short or long, taking off in many different directions) are possible. For example, it could be interesting for students, and helpful for learning valuable ideas-and-skills, to look at the strategies used by scientists when they design experiments and research projects.
Case studies can be useful,
to provide concrete issues to think about and discuss. Here is a supplementary activity that I've used to make a connection between students' lab activities and the process of science:
As a prelab, students do the first Data Analysis handout, described earlier. Then during lab
they measure the density of an unknown liquid (a mixture of ethylene glycol
and water), and
answer two
questions: What are your estimates for the precision of
your measurements, and for the accuracy of
your measurements?
I ask students to review what they know about precision & accuracy, including their similarities and differences. They examine four sets of data that I provide, illustrating
four combinations of precision and accuracy (both are high, both are
low, or one is high and the other low), and students discuss the accuracy and precision in each set. This
provides an opportunity to discuss random
errors & systematic errors. Then
we look at their data.
When I ask students about the accuracy
of their data, they should say (if they understand the concept) that "we
cannot
estimate
accuracy
because
we
don't
know the true value for the density of our
unknown liquid." Then I ask, "How did the values for density
(and Avagadro's Number, speed of light,...) get into the CRC Handbook?" * Here,
the goal is to explore various perspectives on evaluations (and decisions & declarations)
that are made by a scientific community (or
sub-community or committee) or by an individual author or editor. What
are the criteria for developing a rationally
justified confidence in a scientific conclusion? When thinking about this question, here are some interesting sub-questions:
Who did the work? — Should we be more confident
about a value of Avagadro's Number based on a set of 5 experiments done by
one person,
by
a large research group, or by many large groups scattered around the world? We
discuss the process of creative-and-critical thinking that is done by
individuals, in-groups, and out-groups.
What was done? — Should we
place more trust in a value of Avagadro's Number based on 5 similar experiments
that give the same value, or 5 different experiments that give the same
value? This lets us discuss systematic errors, background assumptions,
theoretical
and
experimental interdependencies, and the independent
confirmations that occur if we have many ways to calculate
Avagadro's Number (these can be explained verbally or in print, or students can do research to find them), not just one way.
Some evaluation criteria, used to evaluate the scientific
support for an
idea, are potentially objective; these include
experiments
(how many? how varied? done by different groups?
with reproducible results? good experimental design? interpretation and data analysis?) and theory (logical coherence, consilience,...).
Asking "what can scientists
do if two different techniques give different results?" leads to discussions of experiments
(their design, potential systematic errors, interpretation and analysis of results, reproducibility,...), collective critical thinking in a community, arguments and consensus.
Criteria that are subjective include questions about
the psychology
and
sociology
of critical
thinking,
in persuasion by logic, rhetoric, appeals to authority, and group politics
(personal
or institutional),
in
the
process
of achieving
a community consensus. How
do
scientists
respond
when
two
different
techniques
give different results? In their evaluations, when they compare and evaluate results, can scientists be biased? We
discuss potential sources of bias, including "investments" of finances (such
as owning expensive instruments of one type but not the other) and experience (knowing
how to perform and analyze one type of experiment better than the other) and ego (when
there have been public declarations that one of the techniques is superior). What can scientists do to minimize the practical effects of these biases?
* A related question — asking "how can we know something?" (in the CRC Handbook or elsewhere) — is examined in Calibration Logic and Epistemology.
5. Using Inquiry to help students learn Thinking Skills [overview-summary]
Inquiry Activities in Goal-Directed Labs
Opportunities for inquiry activity occur whenever inadequacy of knowledge (of concepts and/or skills) produces a situation where students don't know "what to do next" so they must think on their own, and are allowed to think. These opportunities for inquiry can be accidental (when a teacher doesn't realize that students are struggling) or the obstacles can be intentional, designed into a lab as thinking activities that let students practice existing skills or learn new skills. If a particular lab has a sufficient amount of inquiry activities compared with other types of thinking activities, so the ratio of inquiry/non-inquiry is high, it can be called an inquiry lab. .....
The "....." shows that this section continues in Guided Inquiry Education for Thinking Skills which describes the importance of achieving An Appropriate Level of Inquiry-Difficulty (as in "a well-written mystery story" with "a level of
challenge that is just right" so students won't be too bored or frustrated) and strategies for Adjusting the Level of Inquiry-Difficulty (by choosing a lab's intrinsic difficulty [what students are asked to do] and by "adjusting its actual difficulty with guidance that modifies students' ability to cope with the lab by helping them prepare before the lab ... and by coaching during the lab") and An Inquiry Lab from UW (which examines "potential questions-and-answers that a teacher can decide to use-or-avoid, with answers defined flexibly, ranging from
direct explanation by a teacher, through various levels of giving hints... and promoting discussions... to letting students construct answers totally by themselves, using only their current knowledge that is based on their previous experiences") and recommends Moderation in the Use of Inquiry: "I think every student should have many opportunities
for small-scale inquiry (such as mini-activities during a lab, or entire "inquiry labs") but I don't think it will be beneficial
if inquiry methods are emphasized too heavily in courses or labs. ... Some inquiry-based learning
is extremely valuable for supplementing student experiences, and is essential for a complete education; inquiry is very useful when used with moderation, but it should not be the main instructional format for conceptual learning in science education, and it should be part of a creative eclectic blending of instructional approaches for helping students improve their thinking skills."